I give a brief introduction to the CooCox CoIDE Integrated Development Environment.
Previous Page: Connect the ST-Link v2 Interface to your Computer
In this video I’m going to show you how to start a new program in the CoIDE environment. When you first start the CoIDE (IDE - Integrated Development Environment) program, you will see a welcome screen which has all the information you need to start a new project, open an existing project, and view the repository for libraries you may need.
You can always get back to this welcome screen, if you lose it, by clicking on the following icon:
You can go back to the repository with this icon: The repository is where all of the main libraries are stored that can be downloaded for the specific microcontroller that you are using to develop.
Lets click on the new project icon to start a new project.
You’ll be presented with a screen that allows you select a variety of microcontrollers starting with the manufacturer. Included in this selection are controllers from ARM, Freescale, NXP, Nuveton, ST, Toshiba, and Spansion.
In this video we’ll be focusing on the ST micro line of microcontrollers and the F0 series is what we’re going to be using initially. You can view different series of microcontrollers in the series list on the left-hand menu.
On the right hand side, you will see the specific microcontrollers under the series you select.
The microcontroller we’re using is the F030 series and the R8T6 or the STM32F030R8T6 microcontroller. We can select this by clicking on the microcontroller designation and a bubble will appear with further selections. In this bubble, our next step is to create a new project from this microcontroller.
You are presented with a dialog box that will allow you to put in a project name, and it shows you the path that you can use for these projects. This is a default path. CoIDE will be under your main user and the CoIDE subfolder path. Name your project. In this example, I'm just naming it GPIOTutorial in preparation for my next tutorial.
Click finish to save the project name to be created under the project path.
This screen is rather important because it is going to show you all of the libraries and different resources that will allow you to program for this specific microcontroller.
For this microcontroller there aren’t many resources available, just the core resources are provided which are all we really need anyway. The resource we need is the stm32f030x8_boot.
Click on it and you will see information that is like a read-me file for the library itself. You can click on links to find out various features of this library.
To get back to the repository, just click on the link for the microcontroller designation.
Go back to the file directory and click “add” on the stm32f030x8_boot file. This will take you to a screen that shows the prerequisite libraries and the library that you selected (stm32f030x8_boot).
these libraries are automatically installed. If you didn't want the library to be installed, simply click on the remove button on the right, but you will probably want the libraries installed unless you selected the wrong library in the first place. You will notice it will require the cmsis_core which is a library that is specific to ARM architecture.
You will also notice that these files and folders appear on the pane on the left-hand side. You can check all of the header files that are within these library folders. The main headers will be under the Src folder. This completes setting up the new project.
You can take a look at the files that were installed under each of these library sub folders. Under the cmsis_core folder, you will see all of the standard ARM structs, tables, math, etc files.
Under the stm32f030x8_boot folder, you will notice all of the library files that are specific to this microcontroller.
the header files that you will mainly use are the stm32f030x8.h and the stm32f0xx.h.
Go ahead and meander through the folder structure to get familiar with what is contained within. the Inc folder will contain all of the more specific libraries to handle the various features and peripherals that are installed within the microcontroller.
You can exit the welcome and repository screens if you wish. I like to remove these screens to clear up the clutter of tabs so I can focus on the actual program. You can easily bring up the welcome and repository screens by selecting the icons at the top (mentioned earlier).
You can now open up your main.c file which is the main entry point and contains the code for the never-ending loop. We should be able to build this program even though there is really nothing in it. You will find your build information on the bottom and where the errors will show up.
To build the program, there is an icon at the top as shown in the following figure. Building will only take the program and create new files with the machine code that the microcontroller can understand.
When you build you’ll notice initially there are a lot of errors that appear on your console. The errors that show up will contain the necessary information to figure out the problem. If the errors are not shown, then the CoIDE developers and library creators fixed the problem; otherwise, the following information will solve the problem.
You will see there are a lot of them, but each one is actually referring to a single file.
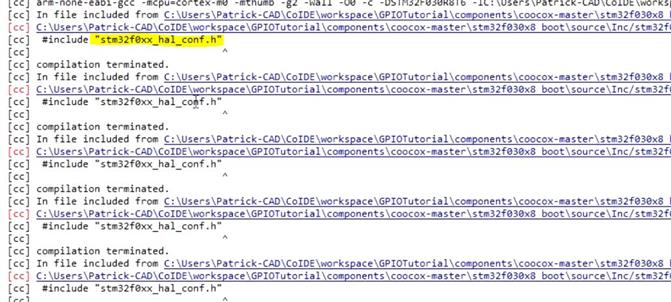
The issue is that the file stm32f0xx_hal_conf.h is saying there is no such file in the directory. That tells us that the file either doesn't exist, or it is located in the wrong place (in a different folder).
It's looking for this file within the stm32f0xx_hal.h file, but is not located within the folder that it should be (the Inc folder).
It is referring to this file in the header file and if you open it you will see that it had an #include that tries to include this file and it is within an if else statement where you will use this file if this define has been found as true or if it is false. What we need to do is try to locate this file and put it into its proper location.
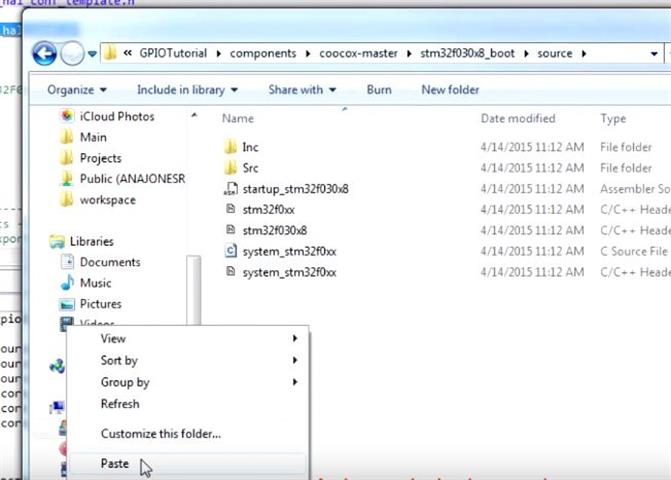
You will also notice that when you look into the real file structure, that this does not show the same information as the Windows explorer would show like the hierarchy of folders. Here is the folder for the GPIO tutorial on the hard drive. It is located in the workspace folder where we specified it. You will see many folders which are not shown in the hierarchy breakdown of folders. We need to go into the folder the error is telling us to go. You will also see the CooCox master is not showing up either so it may seem a little confusing.
Go into the stm32f030x8_boot folder and this is where all the source folders are. So the boot will have this information in it. Go into the source folder and locate the file that cannot be found. Look in the file path on the error to see what folder it is located under. We go into the Inc folder and we cannot find this file, there is only the template of the file. We actually did find the file located in the “test” folder, so copy the file from the "test" folder
and paste it into the “source” folder.
Now lets try to build the code and check the console. The build was successful and the total time was one second.
So that is how to create a new project in the CoIDE, unfortunately there is a bit of a hitch when you’re doing that but there is a simple solution to make it work. So in summary what we’ve done is: create a new project using the welcome screen, associated that project to the correct microcontroller, and built the file after correcting an error that we found after finding the needed dependencies. Thank you for watching.
01. Arduino for Production!! Introduction to ARM Microcontrollers
02. Arduino for Production!! How to Instal and Set up the Arduino IDE (Integrated Development Environment) for the ARM Microcontroller
03. Arduino for Production!! How to Connect the ST-Link v2 ARM Programmer to your Computer
04. Arduino for Production!! How to Use the CoIDE (Adruino IDE) for ARM Microcontroller Development
05. Arduino for Production!! How to Connect the ST-Link v2 to the ARM STM32 Microcontroller
06. Arduino for Production!! How to Output to a Pin to Blink an LED on the ARM Microcontroller Part 1
07. Arduino for Production!! How to Output to a Pin to Blink an LED on the ARM Microcontroller Part 2
08. Arduino for Production!! How to Output to a Pin to Blink an LED on an ARM Microcontroller Part 3
09. Arduino for Production!! Can Not Connect to Target! How to Establish a Connection Again.
10. Arduino for Production!! How to Receive Input from a Pin for Push Button Input (GPIO) on the ARM Microcontroller
11. Arduino for Production!! How to Receive Push Button Input on the ARM Microcontroller Part 2
12. Arduino for Production!! How to Receive Stable GPIO Push Button Input on the ARM Microcontroller - Software Debouncing Part 1
13. Arduino for Production!! How to Receive Stable GPIO PUSH Button Input onthe ARM Microcontroller - Software Debouncing Part 2
14. Arduino for Production - How to Establish Software Debouncing on the ARM Microcontroller Exclusive
15. Arduino for Production!! How to Interface an LCD on the ARM Microcontroller Part 1
16. Arduino for Production!! How to Interface an LCD on the ARM Microcontroller Part 2
17. Arduino for Production!! How to Interface an LCD to an ARM Microcontroller Part 3
18. Arduino for Production!! How to Interface an LCD to the ARM Microcontroller Part 4